Today we’re going to build an image classifier that can distinguish between different types of trees. Specifically, we’ll train a model to recognize bonsai, palm, and willow trees. This project demonstrates how to use the fastai library to create a deep learning application efficiently.
Getting Started
First, let’s import the necessary libraries:
from fastai.vision.all import *
from fastai.vision.widgets import *
from duckduckgo_search import DDGS
from fastdownload import download_url
The fastai library provides high-level APIs that simplify building and training deep learning models. We’ll also use DuckDuckGo’s search API to gather our training data.
Gathering Data
One of the most important steps in any machine learning project is gathering good quality data. For our tree classifier, we’ll use images from the internet:
def search_images(keywords, max_images=200):
    return L(DDGS().images(keywords, max_results=max_images)).itemgot('image')

searches = 'Palm', 'Willow', 'Bonsai'
path = Path('trees')
for o in searches:
    dest = (path/o)
    dest.mkdir(exist_ok=True, parents=True)
    urls = search_images(f'{o} tree', max_images=125)
    download_images(dest, urls=urls)
    time.sleep(10)
    resize_images(path/o, max_size=400, dest=path/o)
This code searches for images of each type of tree, downloads them, and resizes them to a consistent size.
Note: When gathering data from the internet, it’s important to be aware of potential biases in your dataset. Ensure you have a diverse range of images that represent different angles, lighting conditions, and variations of each tree type.
Preparing the Data
Now that we have our images, we need to prepare them for training. fastai provides a convenient DataBlock API for this:
trees = DataBlock(
    blocks=(ImageBlock, CategoryBlock),
    get_items=get_image_files,
    splitter=RandomSplitter(valid_pct=0.2, seed=42),
    get_y=parent_label,
    item_tfms=[Resize(128)],
    batch_tfms=[RandomResizedCrop(128, min_scale=0.35), Flip(), Brightness(), Contrast(), Rotate(max_deg=10.0)]
)

dls = trees.dataloaders(path)
Let’s break this down:
blocks=(ImageBlock, CategoryBlock): This tells fastai that our inputs are images and our outputs are categories.get_items=get_image_files: This function will get all the image files in our directory.splitter=RandomSplitter(valid_pct=0.2, seed=42): This splits our data into training and validation sets. We’re using 20% of our data for validation.get_y=parent_label: This tells fastai to use the parent folder name as the label for each image.item_tfms=[Resize(128)]: This resizes all our images to 128x128 pixels.batch_tfms=[...]: These are data augmentation techniques applied to our images. They help our model generalize better by showing it slightly modified versions of our images.
Note: Data Augmentation is a powerful technique to artificially increase the diversity of your training data. It helps the model learn to be invariant to aspects like orientation, lighting, and small positional changes.
Before we train our model, let’s take a look at some of our training data:
dls.show_batch(max_n=6)

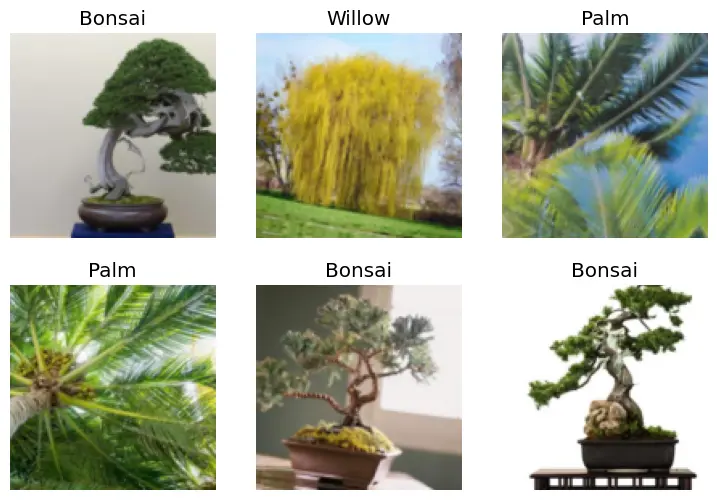
Here you can see 6 images of different labelled tree types we pulled from DuckDuckGo. This gives us a visual preview of what our model will be working with.
Training the Model
Now we’re ready to train our model:
learn = vision_learner(dls, resnet18, metrics=error_rate)
learn.fine_tune(3)
We’re using a pre-trained ResNet18 model and fine-tuning it for our specific task. This technique, known as transfer learning, allows us to leverage knowledge from a model trained on a large dataset and adapt it to our specific problem.
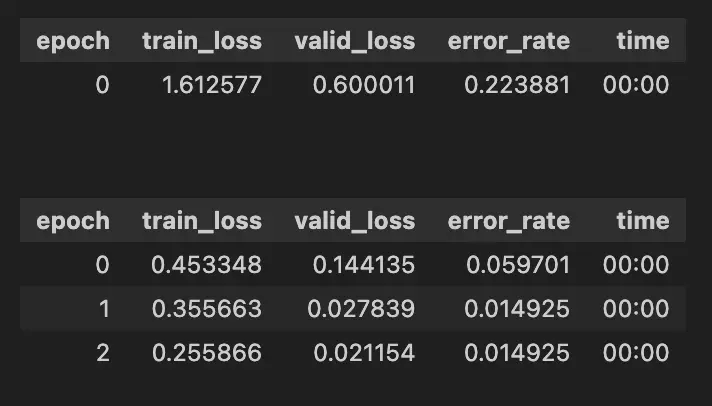
Here’s what our training process looked like:

As we can see, our model’s performance improved significantly over just three epochs. The error rate dropped from about 22% to just 1.5%.
Interpreting Results
After training, it’s crucial to interpret your results:
interp = ClassificationInterpretation.from_learner(learn)
interp.plot_confusion_matrix()

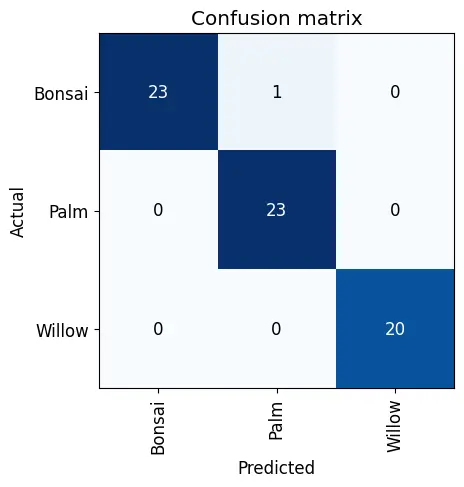
This confusion matrix helps us visualize where our model might be making mistakes. Are there certain types of trees it’s confusing more often?
interp.plot_top_losses(5, nrows=1)
This shows us the images where our model performed worst. It’s a great way to identify potential issues with your dataset or model.
Cleaning Up Our Data
The ImageClassifierCleaner is a useful tool for reviewing and correcting mislabeled images:

We can use this interface to delete incorrect images or change their labels:
# To delete/fix the labels run code below
for idx in cleaner.delete(): cleaner.fns[idx].unlink()
for idx,cat in cleaner.change(): shutil.move(str(cleaner.fns[idx]), path/cat)
Exporting and Using the Model
Once you’re satisfied with your model’s performance, you can export it for use in applications:
learn.export('tree_classifier.pkl')
learn_inf = load_learner('tree_classifier.pkl')
This saves your model in a format that can be easily loaded and used for inference. Now, let’s create a simple app using IPython widgets to classify new images:
btn_upload = widgets.FileUpload()
out_pl = widgets.Output()
lbl_pred = widgets.Label()
btn_run = widgets.Button(description='Classify')

def on_click_classify(change):
    img = PILImage.create(btn_upload.data[-1])
    out_pl.clear_output()
    with out_pl: display(img.to_thumb(128,128))
    pred, pred_idx, probs = learn_inf.predict(img)
    lbl_pred.value = f'Prediction: {pred}; Probability: {probs[pred_idx]:.04f}'

btn_run.on_click(on_click_classify)

display(VBox([widgets.Label('Select your tree!'), btn_upload, btn_run, out_pl, lbl_pred]))")
Testing the Model
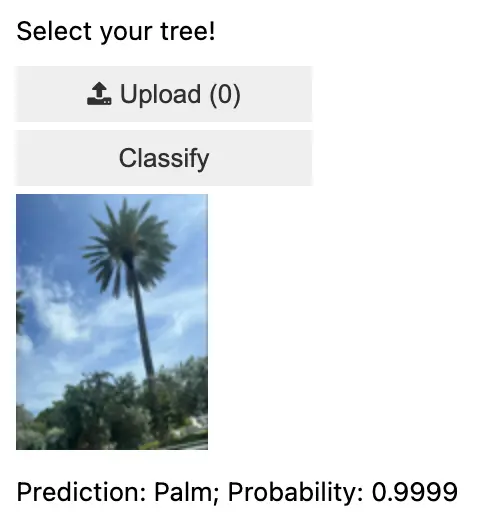
Let’s test our model on a palm tree photo I took in Miami a few weeks ago:

Here’s what our mini-app predicted:

The model correctly identified the palm tree with 99.99% confidence.
Conclusion
In this tutorial, we’ve gone through the process of building a tree classifier using fastai. We covered data collection, preparation, model training, result interpretation, and deployment. This project demonstrates how quickly one can create a functional deep learning application using modern tools.
For those interested in exploring further, you can find the complete code for this project on my GitHub repository.
Whether you’re identifying trees or tackling other classification tasks, the principles we’ve covered here can be applied to a wide range of machine learning projects. Happy coding!


